Wiring devices and lighting fixtures
You will be able to wire convenience outlets and single-pole, 3-way and 4-way switches correctly, mount devices and fixtures straight and secure, and avoid overfilling boxes. These are the parts of the installation the owner touches every day.
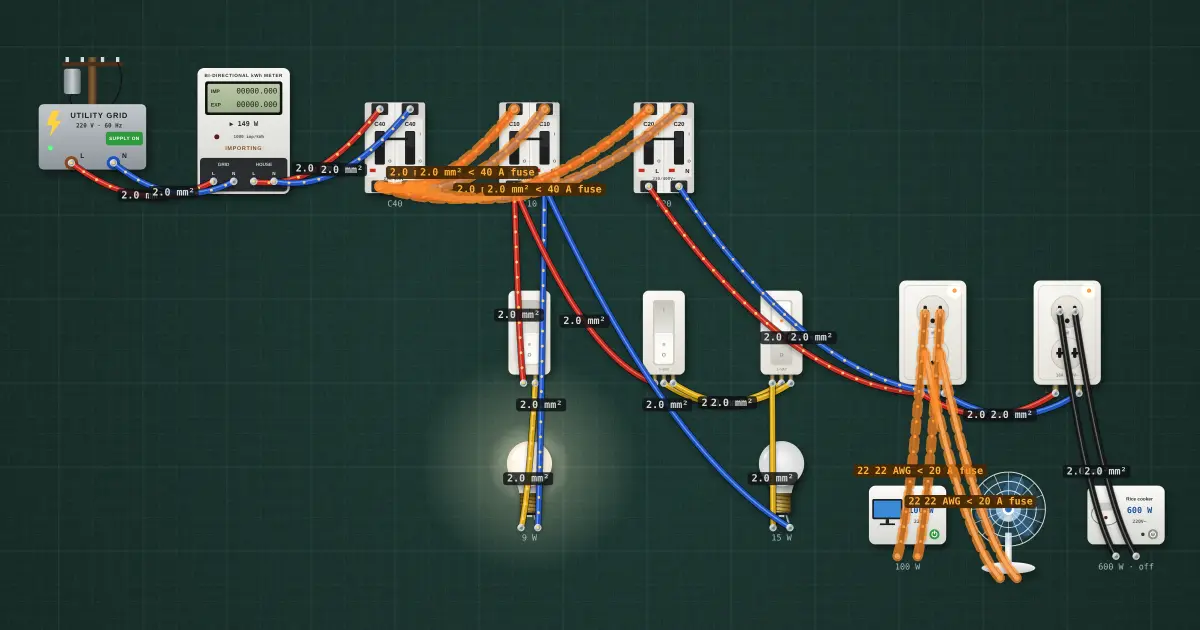
Open this lesson in the labFree, in your browser, no account needed.
How it works
Convenience outlets
| Type | Notes |
|---|---|
| 2-prong (non-grounding) | Found in older houses. No ground pin, so an appliance's metal case has no fault path. New circuits normally use grounding-type outlets. |
| Grounding-type (3-prong) | Has a ground terminal (green screw) connected to the equipment grounding conductor. Many common Philippine outlets accept both flat and round pins plus a ground pin. |
| Weather-resistant outlet with outdoor cover | For outdoor and damp places. The cover must protect the outlet, and where a plug may stay in, an "in-use" (bubble) cover keeps rain out while the plug is in. |
| Special-purpose outlet | A dedicated outlet for one appliance (aircon, range), with the rating and plug shape that appliance needs. |
Polarity. On an outlet with one grounded (neutral) conductor, the code requires the neutral on the terminal marked for it (silver screw, the wider slot on US outlets) and the hot on the brass screw. That way the switch in an appliance or a lamp holder's shell is on the safe side. On a Philippine line-to-line 230 V circuit both pins are live to ground, so "polarity" means mainly that the ground terminal is correctly connected; still connect wires consistently and as the plans or device marking show.
Switches
Always switch the live (ungrounded) conductor. If you switch the neutral, the lamp goes out but the lamp holder stays live, and someone changing a bulb gets a shock. On a two-hot 230 V circuit, one hot is switched; the lamp holder's other side is still live to ground, which is one more reason to turn off the breaker before working on any fixture. Where the plan asks for it, a two-pole switch opens both.
| Switch | Terminals | Use |
|---|---|---|
| Single-pole | Two (plus ground) | One light from one place |
| 3-way | Three: one common and two travelers (plus ground) | One light from two places, such as the top and bottom of a stair |
| 4-way | Four: two pairs of travelers (plus ground) | Placed between two 3-way switches to add a third, fourth ... control point |
How 3-way switching works. Each 3-way switch connects its common terminal to one of its two traveler terminals. Two wires (the travelers) run between the switches. The supply goes to the common of the first switch; the common of the second switch goes to the lamp. The lamp lights when both switches choose the same traveler, and goes out when they choose different ones. Flip either switch and the state changes. A 4-way switch, inserted in the travelers, either passes them straight through or crosses them over, so it too changes the state.
The common terminal is usually a darker screw; check the marking on the device. Most 3-way wiring mistakes come from putting the supply on a traveler terminal.
Dimmers
A dimmer replaces a single-pole switch (3-way dimmers exist too). Use one rated for the load type and wattage: many LED lamps need a dimmer and lamp listed as compatible, and some LED lamps can't be dimmed at all. Dimmers are not used for fans or other motors unless the device is made for them.
Lighting fixtures
- Ceiling fixtures: mounted on an octagonal box or a support rated for the weight. Heavy fixtures and ceiling fans need a box listed for them or separate support.
- Wall fixtures: mounted on a box at the height in the plan, often over mirrors or beside doors.
- Track lighting: a powered track with movable heads, fed from one box and fixed along its length.
- Outdoor and perimeter lights: rated for wet locations, with sealed entries. Pole-mounted perimeter lights need a base or footing, a grounded pole, and wiring from a weatherproof box or handhole.
Connect the switched hot to the fixture's center contact (the lamp holder's shell is on the other side), connect the fixture's ground to the box and grounding conductor, and use connectors rated for the fixture wire.
Mounting heights
Mounting heights are set by the plans. As common practice:
| Device | Typical height to centre, above finished floor |
|---|---|
| Wall switch | About 1.2 to 1.4 m |
| Convenience outlet | About 0.3 to 0.4 m |
| Outlet above a kitchen counter | A little above the counter or backsplash |
| Aircon outlet | Near the unit, as the plan shows |
These are typical figures, not rules. Accessibility standards and the job spec may set others. Follow the plans and keep heights the same throughout the building.
Mounting: straight, flush, rigid
- Devices level and aligned: check with a small level, and line up rows of switches.
- No gap between the plate and the wall. Gaps expose live terminals and look poor. If the box is set back too far, use an extension ring.
- Rigid mounting: the device must not move when a plug is pulled out. Tighten the mounting screws so the yoke sits firmly on the box or the wall surface.
- Fold wires neatly into the box behind the device, grounding conductor first, then the others, without pinching them under the yoke.
Box fill
A box can hold only a limited number of wires and devices, so wires don't get crushed and heat can escape. The code gives a volume allowance per conductor depending on its size, and counts each device (yoke) as two conductors of the largest size connected to it, plus allowances for clamps and the grounding conductors. Compare the total with the box volume marked on the box or listed in the code table. If it doesn't fit, use a deeper box, an extension ring or a larger box.
On the job
- Switch the live conductor; supply on the common of a 3-way.
- Ground every device and fixture.
- Heights from the plan; devices level and rigid.
- Plate tight to the wall, no gaps.
- Box fill within the limit.
Try it on the bench
- Use the three wall switches on the house bench: find which switch controls which lamp and write it down like a plan legend.
- With a switch off, measure each lamp terminal to ground. On a two-hot service one side stays live even with the switch off, so you open the breaker before touching the fixture.
- Plug the desk fan into each wall outlet and measure the outlet voltage under load with the multimeter.
Parts on the bench
- Utility grid
- Net meter
- 3 × AC breaker
- 3 × Wall switch
- 2 × 220 V bulb
- 2 × Wall outlet
- 2 × Household appliance
- 220 V desk fan
In the course
Electrical Installation and Maintenance (NC II-aligned), module “8 · Wiring devices and lighting fixtures”.